In the realm of software development, the ability to deliver high-quality applications swiftly has become a competitive necessity. To meet this demand, teams must navigate the complexities of modern web applications while ensuring seamless functionality and user satisfaction. Automated testing frameworks like Cypress provide a powerful solution, allowing developers to create end-to-end (E2E) tests that simulate real user interactions directly in the browser.
By integrating Cypress with GitHub Actions, GitHub’s native Continuous Integration/Continuous Deployment (CI/CD) platform, development teams can automate their testing processes effectively. This integration allows tests to be automatically triggered on every code commit or pull request, ensuring that any defects or issues are detected early in the development cycle.
In this guide, we will provide a step-by-step walkthrough of:
- Setting up GitHub Actions to run Cypress tests
- Writing and executing Cypress tests within a CI pipeline
- Running tests in different browser environments
- Accessing and generating test reports for continuous monitoring
By following these steps, you will be equipped with the tools to enhance test coverage and maintain high code quality throughout the development lifecycle.
Prerequisites
Before you begin, make sure you have the following:
- Cypress Installed: Verify Cypress is installed in your project. If it’s not, you can install it with the following command:
npm install cypress –save-dev
- GitHub Repository: Make sure you have a GitHub repository where you will set up the GitHub Actions workflow.
- Basic Cypress Test Structure: The latest Cypress projects use either cypress.config.js or cypress.config.ts for configuration, replacing the older cypress.json. Your test files should be located in the cypress/e2e/ directory.
Setting Up GitHub Actions for Cypress
Let’s set up GitHub Actions to automatically run Cypress tests every time code is pushed to your repository.
Step 1: Create the GitHub Actions Workflow
In your GitHub repository, navigate to the Actions tab.
Click on “New Workflow” and choose “Set up a workflow yourself” to create a custom workflow.
Name the file .github/workflows/cypress-tests.yml.
Step 2: Configure the Workflow
In the .yml file, set up a basic workflow to install Cypress and run tests:

This file tells GitHub Actions to trigger Cypress tests on every push and pull request to the main branch. The npx cypress run command will run all tests in headless mode by default.
Step 3: Environment Variables and Configuration
If your application or tests require specific environment variables (such as API keys or configuration values), you can set these up directly in the workflow file:

In this example, we set a CYPRESS_BASE_URL and a secret API key stored in GitHub’s Secrets section.
Step 4: Writing Cypress Tests
With your GitHub Actions workflow in place, you need some basic tests to run.
4.1 Create a Sample Test
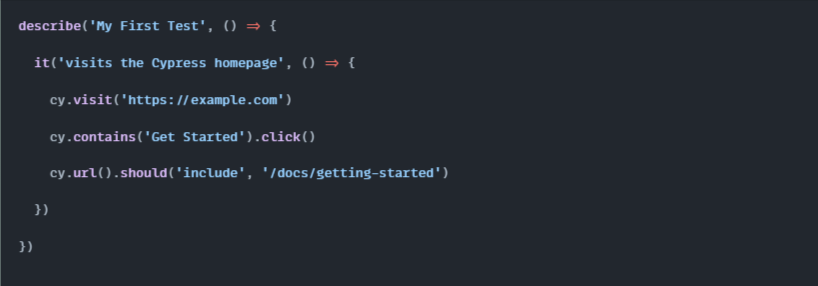
Create a simple test file in the cypress/integration/ directory, for example sample_spec.js:

This simple test visits a page, clicks a button, and checks that the URL changes accordingly.
Step 5: Running Tests in Different Browsers
Cypress supports running tests in different browsers, and you can configure this within the GitHub Actions workflow.
5.1 Update the Workflow File
To run tests in Chrome, for example, update your workflow file like this:

You can also specify other browsers like Edge or Firefox in a similar way, depending on the testing requirements for your project.
Step 6: Test Execution Reporting
Now that tests are running on GitHub Actions, you’ll want to see the results and access reports for review.
6.1 Accessing the Actions Tab
Once a workflow is triggered, navigate to the Actions tab in your GitHub repository. You’ll see the status of your workflow run—whether it passed or failed—along with detailed logs for debugging failed tests.
6.2 Generating Reports
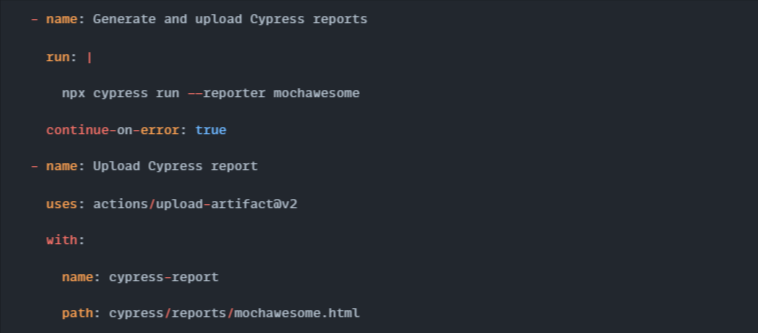
You can extend the workflow to generate and store test reports. For example, using the Cypress mochawesome reporter, you can generate detailed HTML reports:
- Install the required reporter:

2. Configure Cypress to use the reporter by adding this to your cypress.json:

3. Update the workflow to store reports as artifacts:

This will allow you to download the test reports from the GitHub Actions tab after each workflow run.
Conclusion
By integrating Cypress tests with GitHub Actions, you can optimize your development workflow and enhance software quality through automated testing. This powerful combination allows for early identification of bugs, promoting a proactive approach to maintaining code stability. Utilizing these tools increases team efficiency and fosters a culture of continuous improvement. Ultimately, this methodology empowers you to deliver reliable applications that exceed user expectations.
At Testrig Technologies, we understand the importance of quality in your software development journey. As a leading Cypress Testing Company, we offer expert Automation Testing Services designed to fit your unique requirements. Our dedicated team focuses on accelerating your release cycles while ensuring thorough testing to enhance product reliability.
Reach out to us today, and let’s work together to elevate your testing strategy and achieve exceptional results.


